
Everyone seems obsessed with the Kardashians/Jenners theses days , but I'm just obsessed with there make up artist Mario Devindovic . I think we can all agree that Kim Kardashians everyday make up is still more then some of us would wear on a night out but were not all followed around by paparazzi. Cream contouring is time consuming but I love this look for a night out . I have the face of a five year old so its nice to contour the heck out of my face and give my face some structure .
Everyone has this idea that cream contouring its very fake looking and sometimes it can be but if you use lightweight products and blend properly it can look really skin like and more natural then contouring with powder products .
.JPG)

.JPG)
.jpg)
Mario is Kim's make up artist most of the time they have also became great friends over the years , two other make up artists that also do her make up quite frequently are Joyce Bonelli and Rob Scheppy both very talent beauty make up artists as while .
I have watched and read loads of interviews with Mario and his thing really seems to be layering . He doesn't just apply concealer he applies cream , liquid and powder . When he's doing lips he uses a lip pencil a lipstick , lip glosses and even mixes some lipstick together to make the perfect colour . He believes that layering is great for the make ups longevity .
I have watched and read loads of interviews with Mario and his thing really seems to be layering . He doesn't just apply concealer he applies cream , liquid and powder . When he's doing lips he uses a lip pencil a lipstick , lip glosses and even mixes some lipstick together to make the perfect colour . He believes that layering is great for the make ups longevity .
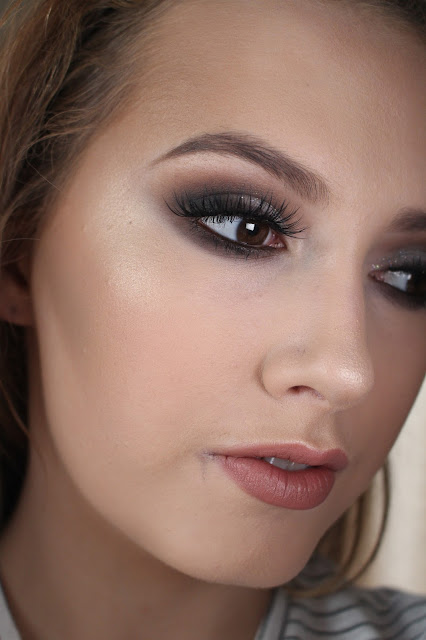
I looked at close up pictures of Kim K and created this look. Its not really based off one of her make up looks but just a mixture of a few .
.JPG)
Eyebrows & Eyes
Step 1 : I started off with the eye brows first . I tinted my eyebrows yesterday so I didn't have much filling in to do . Kim's eyebrows are usually really soft looking nothing to harsh. I filled them in with an eye shadow to create that soft effect.
Step 2 : I then primed my eyes with some concealer . This conceals any pigmentation on my eyelids while making the eye shadow applied on top more vibrant .
Step 3 : I applied a lovely shimmery cream eye shadow with a dome shaped eye shadow brush to my inner tear duct and inner corner of my eyelid. I love the way this looks really brightens up your eyes and makes you look more awake.
Step 4 : I then applied a pale brown matte eye shadow colour as my transition colour with a fluffy blending brush .
Step 5 : I took the same eye shadow again and blending it out under my bottom lash line .
Step 6 : I then applied a dark matte brown to the outer corner of my eyelids , then blending it out .
Step 7: With a black eye pencil I lined the top lash line and created a small flick. I then smoothed it out with an angled brush . (full winged eyeliner tutorial here)
Step 8 : I lined my tight line with the black eye pencil .
Step 9 : I lined my waterline with a white eyeliner pencil . Kim goes between black and white pencils on her waterline but usually wears black when she's going to an evening event.
Step 10 : I applied some mascara to my top and bottom lashes.
Step 11 : I applied Penneys fake lashes in Sultry . Actually my first time wearing these and I really like them . Kim usually wears individual lashes but she's has quite long eyelashes to start off with .
Face
Step 1 : I Made sure there was no make up on my face by using micellar water on a cotton pad . A clean base is essential for an even foundation finish .
.JPG)
Step 2 : I highlighted under my eyes , centre of my nose , centre of my forehead , centre of my chin and under my cheekbone contour .
Step 3 : I contoured the sides of my nose , top of my forehead , sides of my forehead , under my cheekbone, the centre of my cupids bow and under my bottom lip .
Step 4 : With a damp beauty blender I blended the contoured and highlight by damping so I don't move the product .
Step 5 : On top of that I then applied some light liquid foundation on the places I previously highlighted and some darker liquid foundation on top of the contoured previously applied .
Step 6 : I blending this out my dabbing it with the beauty blender and using my fingers .
Step 7 : I powdered my face with translucent powder and a powder puff , dabbing again so none of the make up previously applied moves .
Step 8 : I warmed up the cheeks with a little bronzer .
Step 9 : I applied some blush to my cheeks just to give a natural flush .
Lips
Step 1 : I Lip lined my lips .
Step 2 : I then applied graftobian cream blush as a lipstick .
Step 3 : Last put not least I applied a natural lip gloss .
Exact Products used:
Eyes
Eyelid Primer : Graftobian corrector neutralizer wheel
Eyeshadow Inner Corner : Urban decay Bootycall from the naked 2 palette
Eyeshadow Transition shade: Urban Decay eyeshadow - tease
Outer corner eyeshadow :Inglot cosmetics 329 freedom system eye shadow
Black eyeliner Pencil : Make up Designory black eye pencil
Mascara : Rimmel ScandalEyes Show Off Mascara
White eyeliner pencil :Gosh cosmetics white kohl eyeliner pencil
Fake eyelashes : Penny's/Primark Sultry Fake lashes
Fake eyelash glue : Duo eyelash adhesive dark tone
Skin
Skin prep : Bioderma H20
Cream Highlight : Graftobian HD Glamour Creme Super Palette--Cool (Buff)
Liquid Highlight : Loreal Paris true match foundation - C2
Liquid Contour : Maybelline Fit Me Foundation
Setting Powder: Ben Nye Neutral Set Translucent Face Powder
Blusher : Sleek blush in rose gold
Lips
Lip pencil: Nyx cosmetics slim lip pencil in Natural
Hope you all like this look , I am really happy with the way it turned out and reckon its going to be my go to look on a night out from now on .
As always if you have any questions or want any advice feel free to comment below .
I will do a more in depth contour blog post (best products to use , how to contour for your face shape etc ) soon .
Alannah x

.JPG)

.JPG)

.jpg&container=blogger&gadget=a&rewriteMime=image%2F*)
Great post! I love your easy to follow steps, I'll definitely be giving this a go with your easy to follow tutorial!
ReplyDeleteXx
Thank you , glad you liked it x
DeleteThe result is just beautiful !!
ReplyDeleteNati xx
artdicted2.blogspot.com/
Thank you ! x
DeleteAhhh, beautiful make-up tutorial. I love Kim, it's nice to see this look work so well on someone who has a lighter skin tone than her - gives me hope haha! So jealous of your eyebrows as well, you make me want to grow mine out but I'm not sure I have the patience! Lovely blog btw. Xx
ReplyDelete- Megan
Lattes & London
Thank you very much :) yes haha pale girls struggle . I cant bear the pain of plucking them that's why there that thick haha :)
DeleteThanks for your lovely comment ! x