Khloe Kardashian Blue Eyeshadow Tutorial


I seen Khloe Kardashian post this picture on instagram and knew straight away that I wanted to write a blog post about it . Blue eyeshadow is an eyeshadow colour that seems quite daunting , but she definitely pulls it off . Todays blogpost (which you probably know already from the title) is a tutioral inspired by Khloe Kardashians make up in the picture above. The make up artist that created this look was Mario Dedivanovic.  Its not a complete copy I made a few tweaks here and there . On a side note I thought I looked tan in theses photos and beside khloe I look so pale (and I am wearing a foundation a few shades darker ) . So even pale girls can wear this look ! Yipeee

I am currently writing this at 1:30 am and I am fighting sleep , I will have a lot of typeos to correct tomorrow .

Prep
Step 1 : The key to healthy looking skin is all about the prep Cleanse , Tone , Moisturise to have a clean moisturised base for the make up to apply beautiful on top .

Eyes
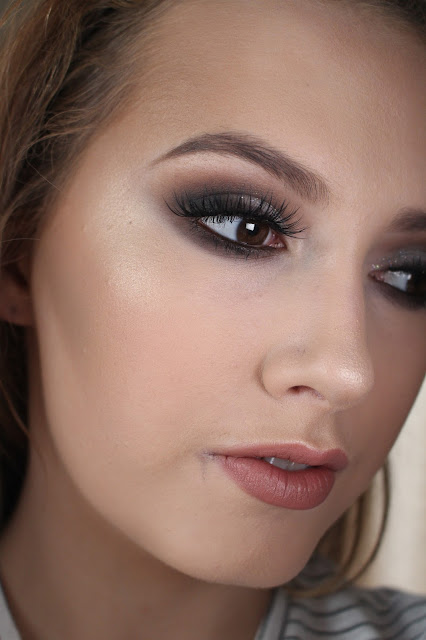
Step 1 : Fill in your waterline and tightline with a black eye pencil .
Step 2 : Prime your eyelid .
Step 3 : Set your eyelid primer to make the eyeshadow applied on top more easy to blend .
Step 4 : Apply some dark blue eyeshadow to the the outer and inner corner of your eyes with a dome eyeshadow brush .
Step 5 : Blend it out but leave a space free in the centre of your eyelids .
Step 6 : With the same dark blue colour apply it underneath your waterline .
Step 7 : Apply a shimmer light blue/silvery colour to the centre of your eyelid .
Step 8 : Apply mascara.
Step 9 : (Optional step ) Apply fake eyelashes , in the picture Khloes eyelashes are very long with not much volume , like she's wearing really long individuals . I wore a strip lash that were long and wispy .

Eyebrows 
Step 1 : Brush your brows .
Step 2 : Fill in your eyebrows .

Skin 
Step 1 : I applied a foundation using a medium coverage foundation and applied it with a stippling brush.
Step 2 : I concealed any blemishes and my under eye bags .
Step 3 :I applied some bronzer as contour to warm up my complexion.
Step 4 : I highlighted the tops of my cheekbones , my cupids bow ( above my lip ) and the centre of my nose .
Step 5 : I applied some blush to the apples of my cheeks . I used a matte warm rose coloured blush.

Lips
Step 1 : I applied some lip balm .
Step 2 : I lined my lips , very very slightly overdrew them .
Step 3 : I applied a peachy nude matte lipstick .
Step 4 : I lastly but not least applied some lipgloss over the top.


Product List 

Prep
Make up Remover : Bioderma 

Eyes
Light blue eyeshadow : Coastalscents ultra shimmer palette

Eyebrows 

Skin 
Highlighter: Sleek Highlighter
Blush: Sleek Blush

Lips

Hope you all liked this blog post , I certainly had fun creating this look . If you have any blog post suggestions or any questions feel free to comment below . 

Whats your opinion on blue eyeshadow ? Interested to know . 

Thanks for reading. 

Alannah x 


Make up Geek Eyeshadows , Worth the Hype ?


Hey everyone , so as you can see my organising didn't really go to plan . In my last blogpost I mentioned that my next blog post would be a loreal true match foundation review . My laptop broke this week so I am kind of all over the place . Anyway enough of that , heres my short but sweet blog post on the Make up Geek eyeshadows . 

   
Without primer 

With Primer


L-R : Bitten , Mango Tango , Goddess , Latte , Peach Smoothie 

Are the make up geek eyeshadows worth the hype ? Quick answer yes ! Theses eyeshadows are in so many Youtubers videos it kind of made me nervous getting them because of the hype and the fact that a lot of there eyeshadows are sent to theses people . 

After receiving them in the mail less then two weeks after purchasing them (which is really good considering they ship from America and I live in Ireland) 

They are pigmented but not overly pigmented . If that makes sense , you can build up the colour which I prefer instead of heaps of colour on the eyelid that takes a year to blend (a little over exaggerating with the time haha)  . I makes it easier to control your eye look when the colour/pigmentation is blend able. Ive had zero fallout with theses eyeshadows too , so if you apply your foundation before your eyeshadow you should have no worries about looking like a panda . 

They blend like a dream ,  they make every other eyeshadow I own seem hard to blend when you compare them to the make up geek eyeshadows . 

Another good thing about theses eyeshadows is the price $5 an eyeshadow and for the quality of the eyeshadows its an absolute bargain . I didn't get charged for customs if anyone is wondering and the shipping wasn't that expensive . 

I store mine in a z palette which you can also buy from there website . 

I love all the colours I got there all warm colours that I have used a lot since getting them . Peach smoothie and Latte are the perfect eyeshadow transition colours . All theses colours work so well together . 

Definitely buying more of there eyeshadows . Great buy . 

Link to there website : Click Here
Blogpost about there dupe eyeshadows for Mac : Click Here 


Hope you have enjoyed this blogpost  , any blogpost suggestions or questions feel free to comment below . Enjoy the weekend . 

Thanks for reading . 

Alannah x 


Going Out Make Up - Step By Step Tutorial


Yayy a blog tutioral thats not my face! Todays blog post is on this make up look i did on my sister one night she was going out . She likes dark/strong make up , so thats what i did . She also asked for and intense inner tear duct highlight . Hope you all like this step by step guide to achieve this look and if you have any questions feel free to comment below .

*Exact products I used listed below*

Prep
Step 1 : Make sure there is no make up or extra oil on her face by using bioderma .

Step 2 : I moisturised here skin so by the time I am on the skin it will have settled in .

Eyes
Step 1 : Prime the eyelids  .

Step 2 : Set the eyelid primer with a setting powder or eyeshadow .

Step 3 : Apply a transition colour into the crease of your eyes. I used a light peach shade .

Step 4 : With a smalls detailer brush apply a medium brown colour to the outer and inner corner of the eyelids leaving the middle of the eyelid free from eyeshadow .

Step 5 : Blend the eyeshadow previously applied into the transition colour , still leaving the centre of the eyelid free from colour .

Step 6 : Dampen your eyeshadow brush and apply a gold eyeshadow to the centre of your eyelid .

Step 7 : Use a small blending brush and blend the edges into the brown eyeshadow .

Step 8 : Apply winged eyeliner (click here for full indept winged eyeliner tutorial) .

Step 9 : Line your waterline and tighline with a black eye pencil .

Step 10 : Blend out a dark brown eyeshadow on your bottom lash line .

Step 11 : Apply mascara .

Step 12 : Apply lashes .

Step 13 : I highlighted the inner tear duct with a pearly white colour . I love highlighter in the inner tear duct , i think it really brightens up the eyes .

Foundation 

Step 1 : Now that the moisturiser has settled in apply some foundation . I used a medium to full coverage foundation .

Step 2 : Powder the foundation to set and to make the make up look matte in photos .

Step 3 : Apply some bronzer to warm up the face .

Step 4 : Apply some highlight to the tops of the cheeks , nose and cupids bow  . This will reflect light and make your skin glow in all the right places without looking oily .

Eyebrows 
Step 1 : Using an angled brush and a brow cream gel i filled in her eyebrows , making them slightly longer at the ends and slightly darker in colour then she  would naturally go for .

Lips
Step 1 : Lined here lips with a lip liner .

Step 2 : Applied lipstick .


Product List 

Eyes 
Medium brown eyeshadow : Urban Decay eyeshadow - Tease
Pencil eyeliner : Gosh cosmetics white kohl eyeliner pencil
Inner Tear duct Highlight : Wet n Wild corrector palette - the white pearlescent shade(cant seem to find it online) 

Face 

My next blog post should be up Thursday/Friday with a full review on the Loreal true match foundation that i did a first impressions blog post on so stay tuned for that . Getting a little bit more organised with this blogging thing .

Hope you all have a lovely day and thanks for reading .

Alannah x

Favourite Summer Lipsticks

The last few days in Ireland have been sunny . I am slightly biest but Ireland has to be one of the nicest places especially when its sunny . The weather made me want to write about something summer inspired . The first thing I think of when I think of summery make up is brighter lip colours .


Here is a few of my favourite colours from my collection with some pictures of them swatched on my lips . Mac Vegas Volt lipstick would also be here if I hadn't lost it on a night out .

Left to Right

 A really bright pink lipstick , nice creamy formula . Can make your teeth look slightly more yellow though which is the only downside .


French brand, a purple lipstick with a  
gold sparkle through it . Very grunge and unique .
  A matte peachy pink lipstick . Quite natural but still a nice colour for summer . I would definitely apply lip balm underneath this lipstick because the Wet'n'Wild matte lipsticks are quite drying.  In person this lipstick has a very matte finish.
A natural plum colour ( if that makes sense ) its not an in your face plum colour . Its quite sheer and moisturizing . Definitely an all year round lipstick .
Another unique colour , a sort of a two tones lipstick with a nice balance between pink and purple . Glossy finish .

As you can see most of my favourite lipsticks have a glossy finish just because my lips get really dry when I wear matte . To get a matte finish on any lipstick apply a thin piece of tissue to your mouth and powder over it with some translucent powder .
Comment below if you have any questions or blog posts you would like to see .
So there is some of my favourite lipstick colours.What's your favourite lipstick colour for summer ?

(Oh and the reason some of my lipsticks don't look very photogenic is because when doing make up I take a bit off the lipstick and apply it to my palette with a spatula .)

Alannah x

Clearing Out Your Make Up Collection / Z Palette Review


Hey everyone ,hope everyone had a nice Easter . I for one ate way to much chocolate and had a lovely day with my family .Todays blog post is about downsizing your make up stash / review on the Z palette .
 
 
Over the years I have collected loads of make up from freebies from magazines , samples , gifts and things I bought myself . I am such a make up hoarder but decided to do a spring cleaning. I had some things in my collection for years that I didn't like or that where completely smashed or dried up . Most of us always reach for the same items of make up we own when we are doing are make up but when we go to throw out are make up we always imagine ourselves being lost without that bright blue eyeshadow that has zero pigmentation and has only ever been swatched on your hand.
 
I really recommend being totally ruthless when clearing out your collection , if you haven't used it in the last year your probably never going to use it . If its mascara and its more then 3-6 months (it depends how much air has gotten into the mascara tube ) throw it out . If a product has separated or smashed get rid of it . If you don't use an eyeshadow enough give it to a friend or a sibling . Its all about decluttering .
 
Think of it this way the more your throw out the more space you have for new make up  . Yippee !Also do your research before splurging on any make up item , if it sounds like what your looking for from the reviews you read then go by it (or pick up a sample ) because there's less of a chance of you not liking the product and your money going to waste . Still a chance but less of a chance .


I recently decided to make and order on the Make up Geek website because I have heard so many good things about the eyeshadows . Since the eyeshadows are sold in pan form I had to buy a Z palette also to store them in .
 
If I didn't need a Z palette for these eyeshadows I would have probably never have bought one . There the kind of boring thing like Jeans or Primer that are essentials but boring to buy . I really was shocked at how much I love this palette . I got the medium palette in black and it fits around 15 eyeshadows . I only bought five Make up geek eyeshadows to try them out and the other square eyeshadows in the palette are from the Urban Decay NYC palette that they came out with a few years ago . The NYC palette is really clumpy so this makes the eyeshadows more compact and I have been using them more now .
 
The palette is easily cleaned and sturdy . The clear window comes in handy when you want a quick look at which eyeshadows are in which palettes. The bottom of the palette is all magnetic and with it you get magnetic stickers to stick to the bottom of your make up .
 
Single eyeshdows , blushers , bronzers anything in pan form can all be in one place , super convenient for travelling .
 
As always if you have any questions feel free to comment below or any make any suggestions on blog posts you would like to see.

Thanks for reading .
Alannah x

Jlo Feel the Light - Make up Tutorial


Todays step by step tutorial is on one of the make up looks from Jennifer Lopez new music video Feel the Light . I love all three looks from the music video but this one is definitely my favourite . This tutorial was fun to create ,it really reminds me of a make up look from the 80s . I usually prefer taking my photos in natural day light but since it was dark when I did this make up look I had to resort to flash photography which kind of washed out the colours . The eye shadow in person is more of a pinky purple shade .

Lets get started :

Eyes

 
Starting with the eyes so any fall out from the eyeshadow can be easily removed .
 
Step 1 : Prime your eyelid using an eyelid primer or concealer .

Step 2 : Apply a pink shadow all over your eyelid up until your socket , bring in up above your socket in the inner corner and under your eyes .

Step 3 : Blend like there's no tomorrow .

Step 4 : Add some purple eye shadow on top of where you applied the pink eyeshadow using a eye shadow brush .

Step 5 : Blend with a fluffy blending brush make sure there's no harsh lines.

Step 6 : Line your tight line (the inner part of your upper lash line) .

Step 7 : Line your waterline with a blue eyeliner pencil .

Step 8 : Draw a black line of eyeliner on your eyelid , keeping it as close as you can to your natural lashes .

Step 9 : Apply fake eyelashes.


Eyebrows


Step 1 : Fill in your eyebrows using your favourite brow product then brush them up ever so slightly .


Skin


Step 1 : Moisturise .

Step 2 : Illuminate using and illuminator to make your skin have that jlo glow .

Step 3 : Foundation .

Step 4 : Concealer under your eyes and any problem areas on your face you might have .

Step 5 : Apply blusher above your cheek bone and don't take it to far into the centre of your face .

Step 6 : Highlight , down the nose and the above the blusher on the cheeks  .

Lips


Step 1 : Line your lips using a pinky purple lip liner .

Step 2 : Apply a glossy pinky purple lip-gloss .


 Products I used :
 
Eyes
Purple eyeshadow :Make up Gallery Eyeshadow (in Dealz & Poundland)  
Blue eyeliner : Penney's /Primark
 
Eyebrows
 
Skin
Highlighter : Sleek MakeUp Face Form
 
Lips 


Hope you all enjoyed this look , not everyone's cup of tea but it was fun to recreate. If you have any questions or blog posts you would like to see feel free to comment below .

What make up tutorial would you like to see next ?

Alannah x