Featured Slider

Showing posts with label going out make up. Show all posts

Sunset Half Cut Crease | Make Up Tutorial

Here is my first Youtube video in ages ! I've really missed Youtube. I created this sunset half cut crease , half cut creases are sooo popular at the moment , they're easy to do once you get the hang of it and flattering on most eye shapes !


These colours are especially lovely since where in the Autumn months . If I was doing a half cut crease with any other colours I would still use the same steps as I did in this video . I find that the Inglot gel liner is the best for cutting the crease . Nail brushes I got in Dealz come in really handy to for liner & carving out the crease because there nice & small  . Also I think the Rebeluna lashes in the style 'Izzy' are my new favourite lashes .

Also top tip for half cut crease : Make sure you carve out the crease a bit above you actually crease so once your eyes are open you can still see the cut crease .


Click ' Here ' to watch the tutorial in HD Quaility .


Product List 
Yellow Eyeshadow : '60' Inglot Cosmetics 
Orange Eyeshadow : '51' Inglot Cosmetics 
Fuchsia Pink Eyeshadow : '63' Freedom Blush Inglot Cosmetics 
Cream Gel Liner : '68' Inglot Cosmetics 
Black Gel Liner : '77' Inglot Cosmetics 
Duraline , Inglot Cosmetics 


Thanks for reading/watching .

Alannah x 

Hint Of Purple | Make Up Tutorial


I wore this look one night over Christmas (which seems like forever ago) . I liked the way it turned out so decided to recreate it again . If you have brown eyes you will love this look because purple complaimets brown eyes .


Step By Step

Step 1 : Prime your eyelids so your eyeshadow doesn't crease and stays put .
Step 2 : To set the primer apply some cream eyeshadow over the primer with a fluffy blending brush .
Step 3: I used a light brown eyeshadow as my transition colour in the socket . Make sure its blended out well by using a fluffy blending brush in circular and windscreen whippier motions .
Step 4: With a dense eyeshadow brush apply some dark brown eyeshadow to the outer corner of my eyelid .
Step 5 : Blend , blend blend .
Step 6 : Go back with the dense eyeshadow brush and apply some black eyeshadow in the same place you applied the dark brown .
Step 7 : Blend out the black .
Step 8 : Apply some glitter to the inner corner of your eyelid . I used a glitter liner to achieve this but if you have fine glitter that can be used on your face you could apply it with some eyelash or glitter glue . Glitter eyeliner is a lot handier though and doesn't leave fall out .
Step 9 : With an eyeliner brush apply some black gel eyeliner to the waterline & tightline of your eye.
Step 10 : Next is winged eyeliner . I used a small eyeliner brush with black gel eyeliner . If you struggle with winged eyeliner I have a full blog post here :
Step 11 : Apply some purple eyeshadow to your bottom lash line .
Step 12 : Apply mascara , I find the best way to apply it is in zig zag motions from the root of the lash to the tip .
Step 13 : I then applied fake eyelashes , this step is optional . I applied some lash glue to the band of the strip eyelashes , leave it 10 seconds then apply straight above my eyelashes .

 
Product List
 
Eyes & Eyebrows
Dark Brown In The Crease : Pippa Palette Blank Canvas In Dodo
Purple Eyeshadow : Dealz Eyeshadow
Skin
Mositruiser : Kiko Glowing Serum
Cream Contour : Penneys Cream Contour Stick
Powder Contour : Smashbox Contour Kit
Setting Powder : Ben Nye Neutral Set
 
Lips

 
Thanks for Reading ,
Alannah x

Going Out Make Up - Step By Step Tutorial


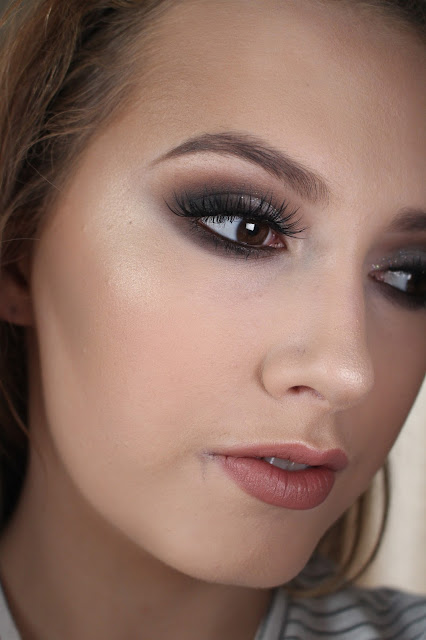
Yayy a blog tutioral thats not my face! Todays blog post is on this make up look i did on my sister one night she was going out . She likes dark/strong make up , so thats what i did . She also asked for and intense inner tear duct highlight . Hope you all like this step by step guide to achieve this look and if you have any questions feel free to comment below .

*Exact products I used listed below*

Prep
Step 1 : Make sure there is no make up or extra oil on her face by using bioderma .

Step 2 : I moisturised here skin so by the time I am on the skin it will have settled in .

Eyes
Step 1 : Prime the eyelids  .

Step 2 : Set the eyelid primer with a setting powder or eyeshadow .

Step 3 : Apply a transition colour into the crease of your eyes. I used a light peach shade .

Step 4 : With a smalls detailer brush apply a medium brown colour to the outer and inner corner of the eyelids leaving the middle of the eyelid free from eyeshadow .

Step 5 : Blend the eyeshadow previously applied into the transition colour , still leaving the centre of the eyelid free from colour .

Step 6 : Dampen your eyeshadow brush and apply a gold eyeshadow to the centre of your eyelid .

Step 7 : Use a small blending brush and blend the edges into the brown eyeshadow .

Step 8 : Apply winged eyeliner (click here for full indept winged eyeliner tutorial) .

Step 9 : Line your waterline and tighline with a black eye pencil .

Step 10 : Blend out a dark brown eyeshadow on your bottom lash line .

Step 11 : Apply mascara .

Step 12 : Apply lashes .

Step 13 : I highlighted the inner tear duct with a pearly white colour . I love highlighter in the inner tear duct , i think it really brightens up the eyes .

Foundation 

Step 1 : Now that the moisturiser has settled in apply some foundation . I used a medium to full coverage foundation .

Step 2 : Powder the foundation to set and to make the make up look matte in photos .

Step 3 : Apply some bronzer to warm up the face .

Step 4 : Apply some highlight to the tops of the cheeks , nose and cupids bow  . This will reflect light and make your skin glow in all the right places without looking oily .

Eyebrows 
Step 1 : Using an angled brush and a brow cream gel i filled in her eyebrows , making them slightly longer at the ends and slightly darker in colour then she  would naturally go for .

Lips
Step 1 : Lined here lips with a lip liner .

Step 2 : Applied lipstick .


Product List 

Eyes 
Medium brown eyeshadow : Urban Decay eyeshadow - Tease
Pencil eyeliner : Gosh cosmetics white kohl eyeliner pencil
Inner Tear duct Highlight : Wet n Wild corrector palette - the white pearlescent shade(cant seem to find it online) 

Face 

My next blog post should be up Thursday/Friday with a full review on the Loreal true match foundation that i did a first impressions blog post on so stay tuned for that . Getting a little bit more organised with this blogging thing .

Hope you all have a lovely day and thanks for reading .

Alannah x