


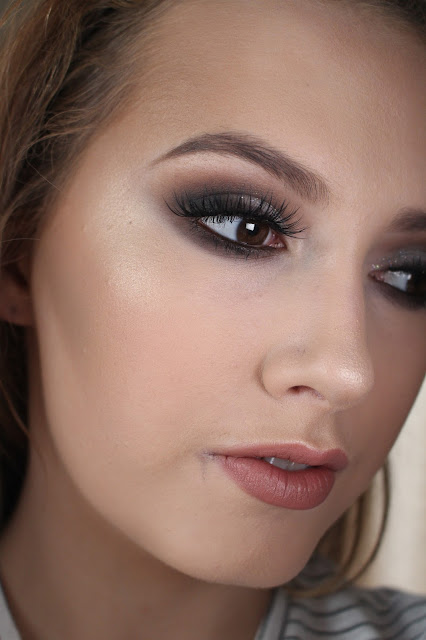
I wore this look one night over Christmas (which seems like forever ago) . I liked the way it turned out so decided to recreate it again . If you have brown eyes you will love this look because purple complaimets brown eyes .
Step By Step
Step 1 : Prime your eyelids so your eyeshadow doesn't crease and stays put .
Step 2 : To set the primer apply some cream eyeshadow over the primer with a fluffy blending brush .
Step 3: I used a light brown eyeshadow as my transition colour in the socket . Make sure its blended out well by using a fluffy blending brush in circular and windscreen whippier motions .
Step 4: With a dense eyeshadow brush apply some dark brown eyeshadow to the outer corner of my eyelid .
Step 5 : Blend , blend blend .
Step 6 : Go back with the dense eyeshadow brush and apply some black eyeshadow in the same place you applied the dark brown .
Step 7 : Blend out the black .
Step 8 : Apply some glitter to the inner corner of your eyelid . I used a glitter liner to achieve this but if you have fine glitter that can be used on your face you could apply it with some eyelash or glitter glue . Glitter eyeliner is a lot handier though and doesn't leave fall out .
Step 9 : With an eyeliner brush apply some black gel eyeliner to the waterline & tightline of your eye.
Step 10 : Next is winged eyeliner . I used a small eyeliner brush with black gel eyeliner . If you struggle with winged eyeliner I have a full blog post here :
Step 11 : Apply some purple eyeshadow to your bottom lash line .
Step 12 : Apply mascara , I find the best way to apply it is in zig zag motions from the root of the lash to the tip .
Step 13 : I then applied fake eyelashes , this step is optional . I applied some lash glue to the band of the strip eyelashes , leave it 10 seconds then apply straight above my eyelashes .
Step By Step
Step 1 : Prime your eyelids so your eyeshadow doesn't crease and stays put .
Step 2 : To set the primer apply some cream eyeshadow over the primer with a fluffy blending brush .
Step 3: I used a light brown eyeshadow as my transition colour in the socket . Make sure its blended out well by using a fluffy blending brush in circular and windscreen whippier motions .
Step 4: With a dense eyeshadow brush apply some dark brown eyeshadow to the outer corner of my eyelid .
Step 5 : Blend , blend blend .
Step 6 : Go back with the dense eyeshadow brush and apply some black eyeshadow in the same place you applied the dark brown .
Step 7 : Blend out the black .
Step 8 : Apply some glitter to the inner corner of your eyelid . I used a glitter liner to achieve this but if you have fine glitter that can be used on your face you could apply it with some eyelash or glitter glue . Glitter eyeliner is a lot handier though and doesn't leave fall out .
Step 9 : With an eyeliner brush apply some black gel eyeliner to the waterline & tightline of your eye.
Step 10 : Next is winged eyeliner . I used a small eyeliner brush with black gel eyeliner . If you struggle with winged eyeliner I have a full blog post here :
Step 11 : Apply some purple eyeshadow to your bottom lash line .
Step 12 : Apply mascara , I find the best way to apply it is in zig zag motions from the root of the lash to the tip .
Step 13 : I then applied fake eyelashes , this step is optional . I applied some lash glue to the band of the strip eyelashes , leave it 10 seconds then apply straight above my eyelashes .
Product List
Eyes & Eyebrows
Eyelid Primer : Smashbox Photo Finish Lid Primer
Cream Eyeshadow : Pippa Palette By Blank Canvas in Lily
Transition Colour : Pippa Palette Blank Canvas In Susu
Dark Brown In The Crease : Pippa Palette Blank Canvas In Dodo
Black Eyeshadow : Pippa Palette By Blank Canvas In K.D
Mascara : Maybelline Great Lash Mascara
Eyeliner : Maybelline Gel Liner in Black
Purple Eyeshadow : Dealz Eyeshadow
Glitter : Collection Glitter Eyeliner Glitz 1
Eyelash Glue : DUO Striplash Adhesive In Clear
Eyelashes : IEnvy By Kiss In 'Diva 01'
Eyebrows : Inglot Matte Eyeshadow in 342
Skin
Mositruiser : Kiko Glowing Serum
Foundation : Make up Forever HD foundation in 118
Concealer : Urban Decay Naked Skin Concealer
Cream Contour : Penneys Cream Contour Stick
Powder Contour : Smashbox Contour Kit
Setting Powder : Ben Nye Neutral Set
Highlighter : Pippa Palette By Blank Canvas
Setting Spray : All Nighter Setting Spray
Lips
Lipliner : Mac Subculture Lip Pencil
Lipgloss : Mac Lipglass in Underage

Thanks for Reading ,
Alannah x
.JPG)

.JPG)
.jpg)
.JPG)
.JPG)

.JPG)

.JPG)

.jpg&container=blogger&gadget=a&rewriteMime=image%2F*)