First Impression : Loreal Infallible 24hr Matte Foundation


When Make up Youtuber LustreLux did a video on this foundation I knew I wanted to try it for myself , she had nothing but good words to say about the foundation . Definitely more of a dewy foundation lover but its nice to look nice and matte on a night out or if you have oily skin . I would have normal but dehydrated skin . I got the lightest shade which is 01 Porcelain which you can see by the pictures is still not light enough . I also bought the mattifying primer that goes with the foundation . I applied the Infallible primer before hand to give the foundation a fair review with its matching primer .A foundation saying it last 24hr is a pretty brave statement (I couldn't imagine needing a foundation to last that long in the first place) .

    No Foundation on (excuse my bed hair & dry skin)


                                            Straight After I Applied The Foundation


                                                                 5 Hours After Applying
Love the texture of this foundation far thicker in texture then my usual lightweight foundations . I find a little goes quite a long way too . The coverage would be medium to full coverage. I could see it working well on a night out .I have been out on a walk and doing other bits and bobs and it looks exactly the way it did when I applied it , no complaints so far. Still matte.

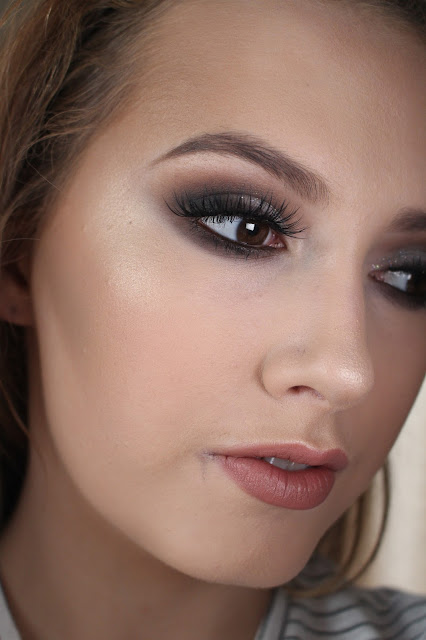
                                                                10 hours After Applying
Staying on pretty well . My red cheeks are still covered as well as uneven pigmentation on my face .

                                                                15 hours After Applying
Notice that has come off around my jawline area slightly . Still matte but little blotchy . I did only apply a little bit of this foundation for a natural everyday look . If I was going out I would apply more of it . My red cheeks are more visible now. So its not lasting 24hr as it says .

My first opinion on this foundation is really good it is definitely matte like it says it is . Good coverage . This would be a nice foundation for a night out and would photograph without any flash back . If you have oily skin you should give it a go , since I don't have oily skin I don't get to try it to its full potential  . Powder isn't needed over the top of it but if your very oily you could still powder . You could nearly get away with just wearing this foundation without concealer because of how pigmented it is. I would repurchase based on my frist impression , i'll try it out properly over the next few weeks and you will probably hear me mentioning it again . Didn't last as long as I thought but it would last a decent amount of time .

Any blog posts you would like to see you can message me on any of these :
Instagram : https://www.instagram.com/alannahharrigan/
Snapchat : alannahmakeup

Thanks For Reading ,
Alannah x

Cheaper Alternative : Benefit Brow Zings Eyebrow Shaping Kit

Top Picture : Benefit , Middle Picture : Benefit on right brow , Sleek on left , Bottom Picture: Sleek

Hey everyone ! Hope your all having a nice week , today  I have a product dupe that I am really proud of not going to lie .Its the Sleek brow kit which is an amazing dupe for the Benefit Eyebrow Shaping Kit  . Sleek are a make up company that are mid price level in the make up world where as Benefit would be more on the higher price side  . I'm going to compare both these products and give my opinions on wither I think you should pay more for a better product or to save money.

Both have a mini angled brush , mini tweezers & mini brush . They also both have a small mirror .

Texture
The Benefit wax has more of a sticky waxy texture then the sleek one . I would also say that the Benefit powder has more of a dusty/chalky texture .

Pigmentation
The sleek powder & wax is slightly more pigmented .

Packaging
Both have very classy looking packaging .  Compact & easy to clean with a small mirror inside .

Colour Range
I am wearing dark in the Sleek eyebrow kit and Bronzing Medium in the Benefit kit .
Both are pretty dark and I personally don't like my eyebrows that dark but for the sake of the review I tried them out . The Benefit has more warm , ginger tones in it where is the Sleek kit is more of a solid brown colour. Sleek have four shades : Light , Dark , Extra Dark & Black .
Benefit have three : Bronzing Light , Bronzing Medium & Bronzing Dark .

Price Sleek €10.99 Vs Benefit €34
saving you €23.01 (had to add the 1cent to be precise haha )

Conclusion
Basically there the exact same just with different packaging and ever so slightly different in colour . Go with the Sleek one to save yourself €23 euro .

Trying to get better at Snapchat , follow me for make up related posts and other random things from throughout the day . Snapchat : alannahmakeup .

Thanks For Reading ,
Alannah x

Hint Of Purple | Make Up Tutorial


I wore this look one night over Christmas (which seems like forever ago) . I liked the way it turned out so decided to recreate it again . If you have brown eyes you will love this look because purple complaimets brown eyes .


Step By Step

Step 1 : Prime your eyelids so your eyeshadow doesn't crease and stays put .
Step 2 : To set the primer apply some cream eyeshadow over the primer with a fluffy blending brush .
Step 3: I used a light brown eyeshadow as my transition colour in the socket . Make sure its blended out well by using a fluffy blending brush in circular and windscreen whippier motions .
Step 4: With a dense eyeshadow brush apply some dark brown eyeshadow to the outer corner of my eyelid .
Step 5 : Blend , blend blend .
Step 6 : Go back with the dense eyeshadow brush and apply some black eyeshadow in the same place you applied the dark brown .
Step 7 : Blend out the black .
Step 8 : Apply some glitter to the inner corner of your eyelid . I used a glitter liner to achieve this but if you have fine glitter that can be used on your face you could apply it with some eyelash or glitter glue . Glitter eyeliner is a lot handier though and doesn't leave fall out .
Step 9 : With an eyeliner brush apply some black gel eyeliner to the waterline & tightline of your eye.
Step 10 : Next is winged eyeliner . I used a small eyeliner brush with black gel eyeliner . If you struggle with winged eyeliner I have a full blog post here :
Step 11 : Apply some purple eyeshadow to your bottom lash line .
Step 12 : Apply mascara , I find the best way to apply it is in zig zag motions from the root of the lash to the tip .
Step 13 : I then applied fake eyelashes , this step is optional . I applied some lash glue to the band of the strip eyelashes , leave it 10 seconds then apply straight above my eyelashes .

 
Product List
 
Eyes & Eyebrows
Dark Brown In The Crease : Pippa Palette Blank Canvas In Dodo
Purple Eyeshadow : Dealz Eyeshadow
Skin
Mositruiser : Kiko Glowing Serum
Cream Contour : Penneys Cream Contour Stick
Powder Contour : Smashbox Contour Kit
Setting Powder : Ben Nye Neutral Set
 
Lips

 
Thanks for Reading ,
Alannah x