


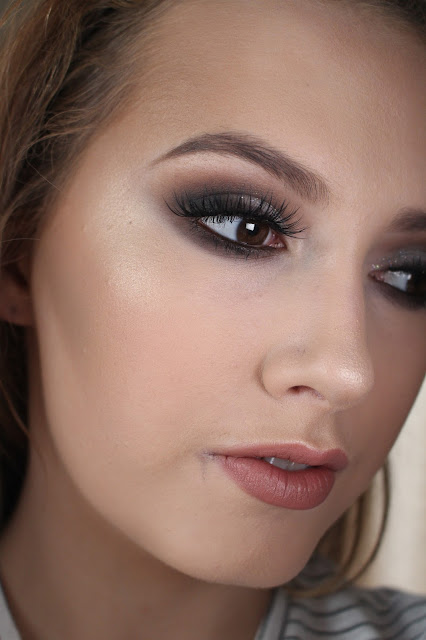
Modern twist on a Marilyn Monroe 1950s inspired make up . A very classic look that will suit everyone and never dates . Its like the little black dress of the make up world , always a safe bet .
Lets jump straight into the tutorial
Eyes & Eyebrows
Step 1 : Starting off with the eyes as usual so any fall out from the eyeshadow can be easily removed without wrecking the make up . I primed the eyelids with a white jumbo pencil .
Step 2 : Set the eyelid primer in place with some cream eyeshadow .
Step 3 : With a fluffy blending brush blend a light orange/brown colour into the out corners of your eyes .
Step 4 : With a smaller detailer brush apply a darker brown into the very corner of your eyelid in a 'v' shape .
Step 5 : Blend out any harsh edges with an eyeshadow blending brush .
Step 6 : Blend some of the soft brown eyeshadow underneath your bottom lash line also.
Step 7 : Line your waterline with a white eye pencil . This little trick helps the eyes to appear bigger and brighter .
Step 8 : Now on to the fun part ... winged eyeliner . I have a detailed winged eyeliner blog post here . But basically I start with some gel eyeliner and a thin brush create the outer part of the wing first to know my angle . I then I go to the inner corner of my eye and join the line to the wing I created .
Step 9 : Apply Mascara .
Step 10 : I then applied lashes , this step is optional . I love fuller looking lashes for special occasions like this so I applied one of my favourite lashes , Ardell Demi wispies . Duo glue was the adhesive I used .
Step 11 : I brushed her eyebrows up then across to get them in shape I then applied a small bit of Anastasia Beverly Hills dipbrow pomade in blonde with an angled brush starting at the outer part of her eyebrow working my way in . With this product a little goes a long way so I used light strokes . To keep her eyebrows in place I applied some clear mascara over the top of them .
Skin
Step 12 : I wiped away any fall out from the eyeshadow then applied some Serozinc from La Roche Posay to a cotton pad an applied it to her face . This preps the skin nicely for make up application.
Step 13 : I applied some illuminator before foundation to give a nice healthy appearance to the skin and to give some moisture to the skin .
Step 14 : I pumped out so foundation onto my palette an applied it to the skin using a stippling brush .
Step 15 : I applied some concealer under her eyes then applied loads of powder on top and left it to bake. I applied some concealer under her eyebrows also to make them more defined .
Step 16 : I went in with contouring sticks , contouring her temples , under her cheekbones, sides of her nose and jawline . I blended them out with a damp beauty blender .
Step 17 : I then powdered her skin to keep it matte and to keep everything in place with a translucent powder . With a clean powder brush I dusted away any excess powder from her under eyes .
Step 18 : I then went over the places I cream contoured and powder contoured for a more dramatic effect .
Step 19 : I applied some highlighter to the tip of her cupids bow , nose and the tops of her cheekbones .
Lips
Step 20 : I applied some red lip liner .
Step 21 : Using a small lip brush I applied red lipstick to her lips .
Lastly I set her face with some setting spray to insure it lasted all night .
Product List
Skin
Illuminator : Kiko cosmetics glowing serum
Foundation : Make up Forever HD foundation
Setting powder : Ben Nye neutral set
Contour : Kiko cosmetics contour sticks & Smashbox powder contour set
Highlighter : Kiko cosmetics eyeshadow in 208
Setting Spray : Urban Decay all nighter setting spray
Concealer : Urban Decay Weightless coverage concealer in fair neutral
Eyes & Eyebrows
Eyelid Primer : Nyx Milk Jumbo pencil
Eyeshadows : Make up Geek - Latte , Make up Geek - Peach Smoothie , Inglot - 342 , Inglot - 329 , Urban Decay - Foxy , Urban Decay - Blackout
Eyeliner : Maybelline Gel eyeliner In Charcoal
Mascara : Maybelline Great Lash
Fake Eyelashes : Ardell Demi Wispies
Eyebrows : Anastasia Beverly Hills Dipbrow Pomade in Blonde
Eyebrow Mascara : Natural Collection Clear Mascara
Lips
Lipstick : Kryolan
Lipliner : Mac Ruby Woo
The hair is just the icing on the cake with this look . My friend Veronica did it . Very 50s .
So that's it for this tutorial I was delighted with the way it turned out . They make up and hair really suited the red dress she was wearing .
Feel free to message or comment below any make up questions you may have , I am always happy to help .
Thanks for reading , and have a lovely week .
Alannah x


.JPG)

.JPG)
