Featured Slider

Showing posts with label cream contour tutorial. Show all posts

How to : Highlighting and Contouring

Contouring has got ridiculously popular over the last two years and believe it or not its been around way before Kim Kardashian started doing it . Contouring is the art of shading , creating shadow to give the illusion of thinner more sculpted features . Highlighting is the opposite ,when you highlight your drawing attention to the highlighted part of your face .


Powder or Cream ?


Cream Highlight Contour
There is no right or wrong here its just up to personal preferences . Cream contouring (when applied very lightly ) can have a more skin like natural look . But I find it can take longer to apply and blend out .

Powder Highlight Contour
Powder is faster to apply and blend out . When I'm in a rush and want a bit of contouring I always resort to powder .

You can also use both for a more dramatic contour and to set the cream contour in place .


Favourite Highlight & Contouring Products

When I am cream contouring and highlighting I use the Graftobian Hd Glamour Crème Palette . It has loads of shades that are very blendable . This is a great versatile palette great for any make up artists kit .

When I am contouring with powder I use Smashbox contour palette which I couldn't recommend more . Three shades that are the perfect contouring shades not too warm or not too ashy . Mirror , small compact packaging great for on the go , comes with a brush and tips on how and where to apply it . Such a brilliant product .

There is loads more contouring products on the market including the ever so popular Anastasia Beverly Hills contouring palette. Which I have yet decided wither I want to buy it or not after hearing lots of mixed reviews .

Matte or Dewy ?

For contouring you need to use a matte product to create shadow and dimension.
For highlighting you can use matte or shimmery products , but I would only apply shimmery highlighter to the tops of your cheekbones , centre of your cupids bow and tip of your nose . Highlighting with a shimmery highlighter in more places on your face will make you look  like a vampire from Twilight. I apply matte highlight to the rest of the places .

Where to Contour?

I for example contour down the sides of my nose , to make it look slimmer , under my cheekbone to give myself more chiseled cheekbones , under my jawline to soften my jawline and my temples and forehead to make my forehead look smaller . If you for example have a really small nose , there's no point of you contouring it , if you have a small forehead there's no point in you contouring it because it will only make it smaller .

Here's a guide on where to contour and highlight your face shape .

 
What brush do you use ?
When using powder contouring and highlighting products I like to use an angled fluffy brush . The handy brush that comes with the Smashbox contour kit is perfect .
For cream contouring and highlighting I like to squeeze my stippling brush to apply the product with more control then when the product applied to the area I want I stop squeezing the brush and blend it out .
 
 
Cream Contouring Step By Step
 
Step 1 : I applied a lighter foundation from the Graftobian HD Glamour Crème palette using a flat foundation brush to apply it . To the centre of my forehead , under my eyes , centre of my nose and centre of my chin.
 
Step 2 : Using a smaller brush with a foundation darker then my skintone I contoured down the sides of my nose , centre of my cupids bow , under my cheekbone , below my lips , my jawline , my temples and the top of my forehead .
 
Step 3 : I blended out my contour to make it more natural looking with a damp beauty blender .
 
Step 4 : I then applied some foundation with a stippling brush .


Powder Contouring Step By Step
 
Step 1 : I applied my foundation with a stipple brush .
Step 2 : Using a powder brush I applied a matte highlighting powder under my eyes , centre of my forehead , centre of my chin and down the centre of my nose .
Step 3 : I then went ahead using bronzer to warm up by face and as a transition colour for my contour .
Step 4 : Using a small angled powder brush I contoured the sides of my nose , temples , top of my
forehead , jawline and under my cheekbone .
 
 
So that's that, if there's anything I haven't covered comment or message me with your questions and I will get back to you .

Hope you all have a nice week .
 
Alannah x

Kim Kardashian Make up + Cream Contouring Tutioral

Everyone seems obsessed with the Kardashians/Jenners theses days , but I'm just obsessed with there make up artist Mario Devindovic . I think we can all agree that Kim Kardashians everyday make up is still more then some of us would wear on a night out but were not all followed around by paparazzi. Cream contouring is time consuming but I love this look for a night out . I have the face of a five year old so its nice to contour the heck out of my face and give my face some structure .


Everyone has this idea that cream contouring its very fake looking and sometimes it can be but if you use lightweight products and blend properly it can look really skin like and more natural then contouring with powder products .


 Mario is Kim's make up artist most of the time they have also became great friends over the years  , two other make up artists that also do her make up quite frequently are Joyce Bonelli and Rob Scheppy both very talent beauty make up artists as while .

 I have watched and read loads of interviews with Mario and his thing really seems to be layering . He doesn't just apply concealer he applies cream , liquid and powder . When he's doing lips he uses a lip pencil a lipstick , lip glosses and even mixes some lipstick together to make the perfect colour . He believes that layering is great for the make ups longevity .
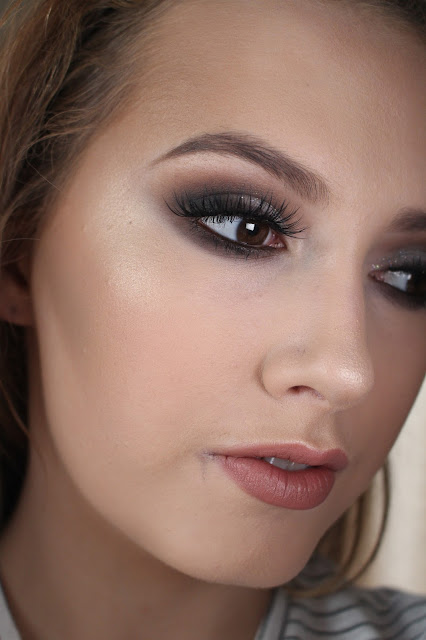
I looked at close up pictures of Kim K and created this look. Its not really based off one of her make up looks but just a mixture of a few .
 
Eyebrows & Eyes
 
Step 1 : I started off with the eye brows first . I tinted my eyebrows yesterday so I didn't have much filling in to do . Kim's eyebrows are usually really soft looking nothing to harsh. I filled them in with an eye shadow to create that soft effect.
 
Step 2 : I  then primed my eyes with some concealer . This conceals any pigmentation on my eyelids while making the eye shadow  applied on top more vibrant .
 
Step 3 : I applied a lovely shimmery cream eye shadow with a dome shaped eye shadow brush to my inner tear duct and inner corner of my eyelid. I love the way this looks really brightens up your eyes and makes you look more awake.
Step 4 : I then applied a pale brown matte eye shadow colour as my transition colour with a fluffy blending brush .
Step 5 : I took the same eye shadow again and blending it out under my bottom lash line .
 
Step 6 : I then applied a dark matte brown to the outer corner of my eyelids , then blending it out .
Step 7: With a black eye pencil I lined the top lash line and created a small flick. I then smoothed it out with an angled brush . (full winged eyeliner tutorial here)
Step 8 : I lined my tight line with the black eye pencil .
 
Step 9 : I lined my waterline with a white eyeliner pencil . Kim goes between black and white pencils on her waterline but usually wears black when she's going to an evening event.
 
Step 10 : I applied some mascara to my top and bottom lashes.
Step 11 : I applied Penneys fake lashes in Sultry . Actually my first time wearing these and I really like them . Kim usually wears individual lashes but she's has quite long eyelashes to start off with .
 
Face
Step 1 : I Made sure there was no make up on my face by using micellar water on a cotton pad . A clean base is essential for an even foundation finish .
 
Step 2 : I highlighted under my eyes , centre of my nose , centre of my forehead , centre of my chin and under my cheekbone contour .
Step 3 : I contoured the sides of my nose , top of my forehead , sides of my forehead , under my cheekbone, the centre of my cupids bow and under my bottom lip .
Step 4 : With a damp beauty blender I blended the contoured and highlight by damping so I don't move the product .
Step 5 : On top of that I then applied some light liquid foundation on the places I previously highlighted and some darker liquid foundation on top of the contoured previously applied .
Step 6 : I blending this out my dabbing it with the beauty blender and using my fingers .
Step 7 : I powdered my face with translucent powder and a powder puff , dabbing again so none of the make up previously applied moves .
Step 8 : I warmed up the cheeks with a little bronzer .
Step 9 : I applied some blush to my cheeks just to give a natural flush .
Lips
Step 1 : I Lip lined my lips .
Step 2 : I then applied graftobian cream blush as a lipstick .
Step 3 : Last put not least I applied a natural lip gloss  .


Exact Products used:
Eyes
Eyeshadow Transition shade: Urban Decay eyeshadow - tease
Black eyeliner Pencil : Make up Designory black eye pencil
Fake eyelashes : Penny's/Primark Sultry Fake lashes
Fake eyelash glue : Duo eyelash adhesive dark tone

Skin
Skin prep : Bioderma H20

Lips


Hope you all like this look , I am really happy with the way it turned out and reckon its going to be my go to look on a night out from now on .

As always if you have any questions or want any advice feel free to comment  below .

I will do a more in depth contour blog post (best products to use , how to contour for your face shape etc ) soon .

Alannah x