Featured Slider

Khloe Kardashian Blue Eyeshadow Tutorial


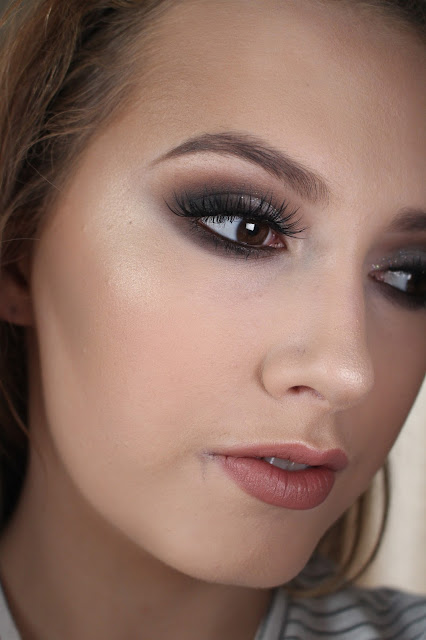
I seen Khloe Kardashian post this picture on instagram and knew straight away that I wanted to write a blog post about it . Blue eyeshadow is an eyeshadow colour that seems quite daunting , but she definitely pulls it off . Todays blogpost (which you probably know already from the title) is a tutioral inspired by Khloe Kardashians make up in the picture above. The make up artist that created this look was Mario Dedivanovic.  Its not a complete copy I made a few tweaks here and there . On a side note I thought I looked tan in theses photos and beside khloe I look so pale (and I am wearing a foundation a few shades darker ) . So even pale girls can wear this look ! Yipeee

I am currently writing this at 1:30 am and I am fighting sleep , I will have a lot of typeos to correct tomorrow .

Prep
Step 1 : The key to healthy looking skin is all about the prep Cleanse , Tone , Moisturise to have a clean moisturised base for the make up to apply beautiful on top .

Eyes
Step 1 : Fill in your waterline and tightline with a black eye pencil .
Step 2 : Prime your eyelid .
Step 3 : Set your eyelid primer to make the eyeshadow applied on top more easy to blend .
Step 4 : Apply some dark blue eyeshadow to the the outer and inner corner of your eyes with a dome eyeshadow brush .
Step 5 : Blend it out but leave a space free in the centre of your eyelids .
Step 6 : With the same dark blue colour apply it underneath your waterline .
Step 7 : Apply a shimmer light blue/silvery colour to the centre of your eyelid .
Step 8 : Apply mascara.
Step 9 : (Optional step ) Apply fake eyelashes , in the picture Khloes eyelashes are very long with not much volume , like she's wearing really long individuals . I wore a strip lash that were long and wispy .

Eyebrows 
Step 1 : Brush your brows .
Step 2 : Fill in your eyebrows .

Skin 
Step 1 : I applied a foundation using a medium coverage foundation and applied it with a stippling brush.
Step 2 : I concealed any blemishes and my under eye bags .
Step 3 :I applied some bronzer as contour to warm up my complexion.
Step 4 : I highlighted the tops of my cheekbones , my cupids bow ( above my lip ) and the centre of my nose .
Step 5 : I applied some blush to the apples of my cheeks . I used a matte warm rose coloured blush.

Lips
Step 1 : I applied some lip balm .
Step 2 : I lined my lips , very very slightly overdrew them .
Step 3 : I applied a peachy nude matte lipstick .
Step 4 : I lastly but not least applied some lipgloss over the top.


Product List 

Prep
Make up Remover : Bioderma 

Eyes
Light blue eyeshadow : Coastalscents ultra shimmer palette

Eyebrows 

Skin 
Highlighter: Sleek Highlighter
Blush: Sleek Blush

Lips

Hope you all liked this blog post , I certainly had fun creating this look . If you have any blog post suggestions or any questions feel free to comment below . 

Whats your opinion on blue eyeshadow ? Interested to know . 

Thanks for reading. 

Alannah x 


Make up Geek Eyeshadows , Worth the Hype ?


Hey everyone , so as you can see my organising didn't really go to plan . In my last blogpost I mentioned that my next blog post would be a loreal true match foundation review . My laptop broke this week so I am kind of all over the place . Anyway enough of that , heres my short but sweet blog post on the Make up Geek eyeshadows . 

   
Without primer 

With Primer


L-R : Bitten , Mango Tango , Goddess , Latte , Peach Smoothie 

Are the make up geek eyeshadows worth the hype ? Quick answer yes ! Theses eyeshadows are in so many Youtubers videos it kind of made me nervous getting them because of the hype and the fact that a lot of there eyeshadows are sent to theses people . 

After receiving them in the mail less then two weeks after purchasing them (which is really good considering they ship from America and I live in Ireland) 

They are pigmented but not overly pigmented . If that makes sense , you can build up the colour which I prefer instead of heaps of colour on the eyelid that takes a year to blend (a little over exaggerating with the time haha)  . I makes it easier to control your eye look when the colour/pigmentation is blend able. Ive had zero fallout with theses eyeshadows too , so if you apply your foundation before your eyeshadow you should have no worries about looking like a panda . 

They blend like a dream ,  they make every other eyeshadow I own seem hard to blend when you compare them to the make up geek eyeshadows . 

Another good thing about theses eyeshadows is the price $5 an eyeshadow and for the quality of the eyeshadows its an absolute bargain . I didn't get charged for customs if anyone is wondering and the shipping wasn't that expensive . 

I store mine in a z palette which you can also buy from there website . 

I love all the colours I got there all warm colours that I have used a lot since getting them . Peach smoothie and Latte are the perfect eyeshadow transition colours . All theses colours work so well together . 

Definitely buying more of there eyeshadows . Great buy . 

Link to there website : Click Here
Blogpost about there dupe eyeshadows for Mac : Click Here 


Hope you have enjoyed this blogpost  , any blogpost suggestions or questions feel free to comment below . Enjoy the weekend . 

Thanks for reading . 

Alannah x 


Going Out Make Up - Step By Step Tutorial


Yayy a blog tutioral thats not my face! Todays blog post is on this make up look i did on my sister one night she was going out . She likes dark/strong make up , so thats what i did . She also asked for and intense inner tear duct highlight . Hope you all like this step by step guide to achieve this look and if you have any questions feel free to comment below .

*Exact products I used listed below*

Prep
Step 1 : Make sure there is no make up or extra oil on her face by using bioderma .

Step 2 : I moisturised here skin so by the time I am on the skin it will have settled in .

Eyes
Step 1 : Prime the eyelids  .

Step 2 : Set the eyelid primer with a setting powder or eyeshadow .

Step 3 : Apply a transition colour into the crease of your eyes. I used a light peach shade .

Step 4 : With a smalls detailer brush apply a medium brown colour to the outer and inner corner of the eyelids leaving the middle of the eyelid free from eyeshadow .

Step 5 : Blend the eyeshadow previously applied into the transition colour , still leaving the centre of the eyelid free from colour .

Step 6 : Dampen your eyeshadow brush and apply a gold eyeshadow to the centre of your eyelid .

Step 7 : Use a small blending brush and blend the edges into the brown eyeshadow .

Step 8 : Apply winged eyeliner (click here for full indept winged eyeliner tutorial) .

Step 9 : Line your waterline and tighline with a black eye pencil .

Step 10 : Blend out a dark brown eyeshadow on your bottom lash line .

Step 11 : Apply mascara .

Step 12 : Apply lashes .

Step 13 : I highlighted the inner tear duct with a pearly white colour . I love highlighter in the inner tear duct , i think it really brightens up the eyes .

Foundation 

Step 1 : Now that the moisturiser has settled in apply some foundation . I used a medium to full coverage foundation .

Step 2 : Powder the foundation to set and to make the make up look matte in photos .

Step 3 : Apply some bronzer to warm up the face .

Step 4 : Apply some highlight to the tops of the cheeks , nose and cupids bow  . This will reflect light and make your skin glow in all the right places without looking oily .

Eyebrows 
Step 1 : Using an angled brush and a brow cream gel i filled in her eyebrows , making them slightly longer at the ends and slightly darker in colour then she  would naturally go for .

Lips
Step 1 : Lined here lips with a lip liner .

Step 2 : Applied lipstick .


Product List 

Eyes 
Medium brown eyeshadow : Urban Decay eyeshadow - Tease
Pencil eyeliner : Gosh cosmetics white kohl eyeliner pencil
Inner Tear duct Highlight : Wet n Wild corrector palette - the white pearlescent shade(cant seem to find it online) 

Face 

My next blog post should be up Thursday/Friday with a full review on the Loreal true match foundation that i did a first impressions blog post on so stay tuned for that . Getting a little bit more organised with this blogging thing .

Hope you all have a lovely day and thanks for reading .

Alannah x